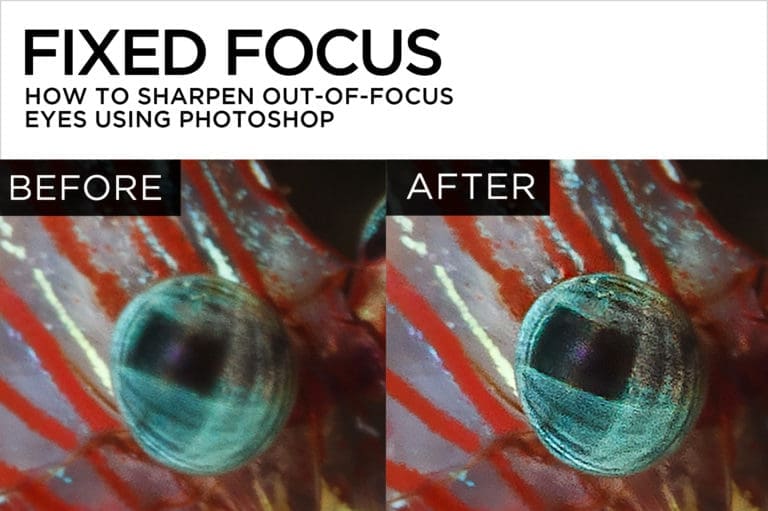
Spot Check
Two Dirty Tricks that Remove Backscatter in Photoshop
Ugh. Backscatter. It’s the nemesis of every underwater photographer. Many have tried, but no one’s been able to conjure the sorcery that would banish it easily in post. Using Lightroom’s clunky Spot Removal tool for any serious goo removal is anything but magic.
Luckily, if you have the right photo, Photoshop provides a couple of quick and dirty techniques that make backscatter removal less of a chore. Both of the techniques in this article work well on images with solid black, blue, or blurred backgrounds. Where the backscatter obscures important image detail, it’s best to resort to old-school spot-by-spot removal.
REMOVING BACKSCATTER USING THE DUST & SCRATCHES FILTER
The Dust & Scratches filter was developed to restore old or damaged images to their shiny best. It works by blurring contiguous pixels until any dust and/or scratches/and or backscatter are no longer visible, and adds back in a little texture to simulate grain. Unfortunately, the Dust & Scratches filter blurs out all detail, not just backscatter, so areas with unwanted blur need to be hidden with a layer mask.
This technique works best if you do a quick first pass with traditional cleanup tools like the healing brush or patch tool to remove any large chunks of scatter.
- Make a copy of the background layer. (CMD/CTRL – J)
- With that layer selected, go to Filter>Noise>Dust and Scratches
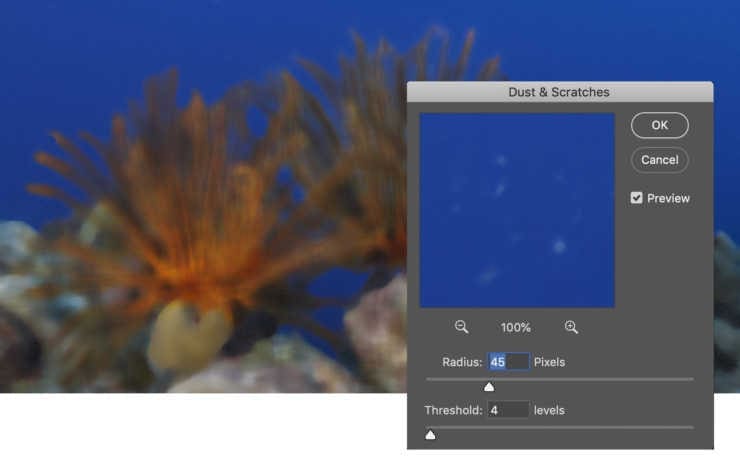
- Set both Radius and Threshold sliders all the way to the left, back to their minimums.
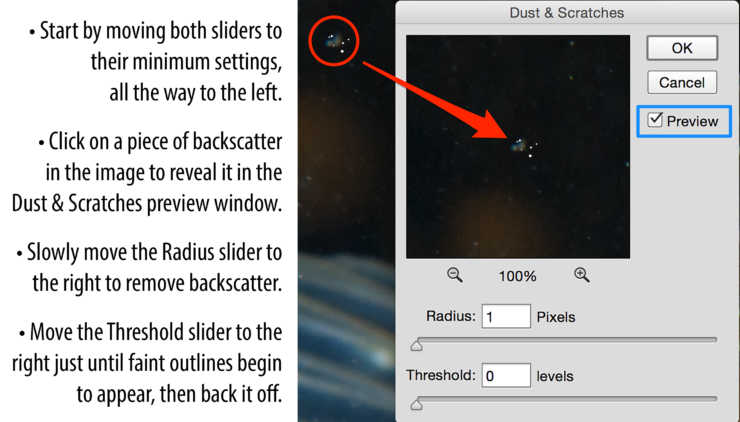
- Click on a piece of backscatter in the photo in order to see it magnified in the dialog box preview window.
- Move the Radius slider to the right until the backscatter completely blurs out, then edge it a tiny bit further to the right for good measure. The Radius slider controls the intensity of the blur.
- Move the Threshold slider to the right until you see the outlines of any backscatter barely start to reappear, then edge it back to the left until no outlines remain. The Threshold slider helps to maintain a certain amount of grain-like texture in the photo.
- Click OK
- Add a layer mask to the top (blurred) layer. The “Add layer mask” icon is at the bottom of the layers panel. It looks like a piece of paper with a hole cut in the middle. Click on it to add a layer mask to the Dust & Scratches layer. Painting with black on a layer mask conceals the pixels of the layer that the mask is attached to. Painting with white reveals the pixels of the layer that the mask is attached to.
- Select a Brush from the tool panel (the keyboard shortcut is the letter B), and make sure it’s in Normal blending mode at 100% opacity, by checking the tool options bar at the top of the window. You can also adjust the brush size from the options bar, or you can tap the right or left bracket keys to make the brush bigger or smaller.
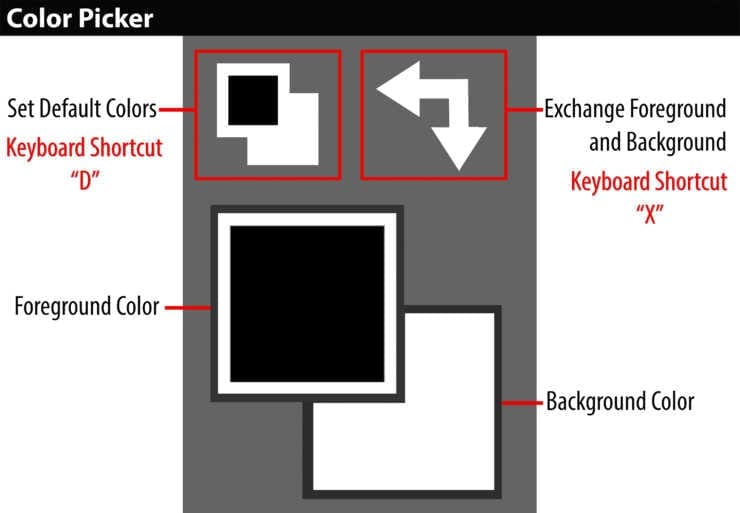
- Set the foreground color to black. You do this by adjusting the color picker, which is the small icon at the bottom of the tools panel. Tapping the letter “D” on the keyboard will set the color picker to pure black and white. Make sure the top square (foreground color) is black. To exchange the foreground and background color, either click on the small double-headed arrow above the colored squares, or tap the letter “X”.
- Paint with black over any areas that should appear sharp. Painting with black will hide the blur created by the Dust and Scratches filter, restoring sharpness where you need it. If you make a mistake, hit the “X” key to exchange the foreground and background colors, and paint with white to reinstate blurred pixels.
- When the backscatter removal has been finessed, go to Filter>Noise>Add Noise
- Click the Monochromatic checkbox ON
- Click on an area that displays both blurred and sharp pixels in order to see it in the dialog box preview window.
- Move the Amount slider to the right until the blurred and sharp areas have a similar grain structure.
- Switch between Uniform and Gaussian Distribution to see which works best.
- Click OK

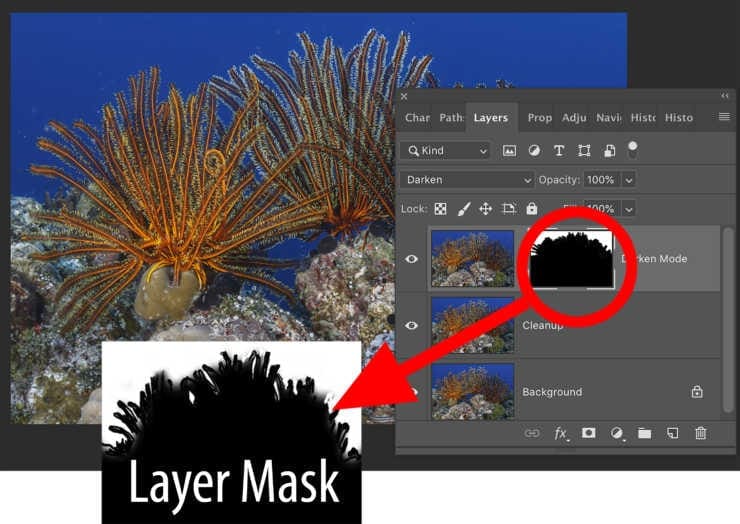
REMOVING BACKSCATTER USING DARKEN BLENDING MODE
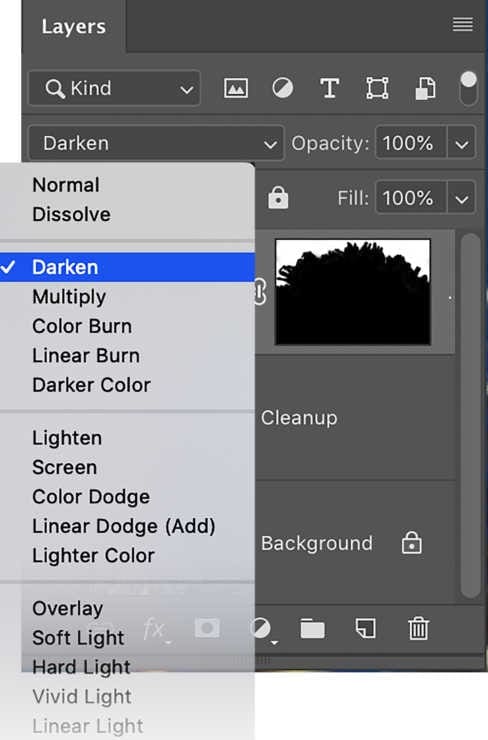
Each Blending Mode is a set of instructions that changes the way a layer interacts with the layer under it. Darken mode compares the top layer to the one beneath and keeps the darkest pixels of the two. If the top layer and bottom layer color are the same, then there is no change.
If you move or resize the pixels in the top layer, some dark pixels (water) will cover the light pixels (backscatter) on the layer beneath.
- Make a copy of the background layer. (CMD/CTRL – J)
- With that layer selected, set the Blending Mode at the top of the layers panel to Darken. The Blending Mode menu is set to Normal by default.
- Go to Edit>Free Transform (CMD/CTRL-T)
- While holding down the Option (Mac) or ALT (PC) key, grab a corner of the ensuing Transform bounding box and pull diagonally outward away from the center, just until the backscatter disappears.
![]()
- Click Return/Enter to set the transformation.
- Follow steps 8-17 above.
PRO TIP:
To create a layer mask that’s filled with black instead of white, hold down Option or ALT while clicking on the “Add layer mask” icon.