Let There Be Light
Using Lightroom’s filter tools to reposition your strobes in post
One of the most difficult skills to master in underwater photography is lighting. While it’s always best to get it right in camera, Lightroom provides powerful local tools to help finesse your lighting after the fact. My favorites are Lightroom’s Graduated and Radial Filter tools. These tools aren’t entirely intuitive, so don’t get discouraged if it takes you a while to grasp the concept. Once you do, you’ll wonder how you ever got along without them.

Clicking on a Filter icon reveals a group of adjustment sliders that closely resemble the sliders in Lightroom’s Basic panel. Unlike the Basic panel, where adjustments affect the entire image globally, the filter tools are applied locally, which means they only affect a selected part of the image.
The Graduated Filter is a linear gradient that’s always strongest near the outer edge of a photo, gradually fading as you drag it towards the center. A filter can contain any combination of slider settings, and there’s no limit to the number of filters allowed, so they can be crisscrossed and layered.
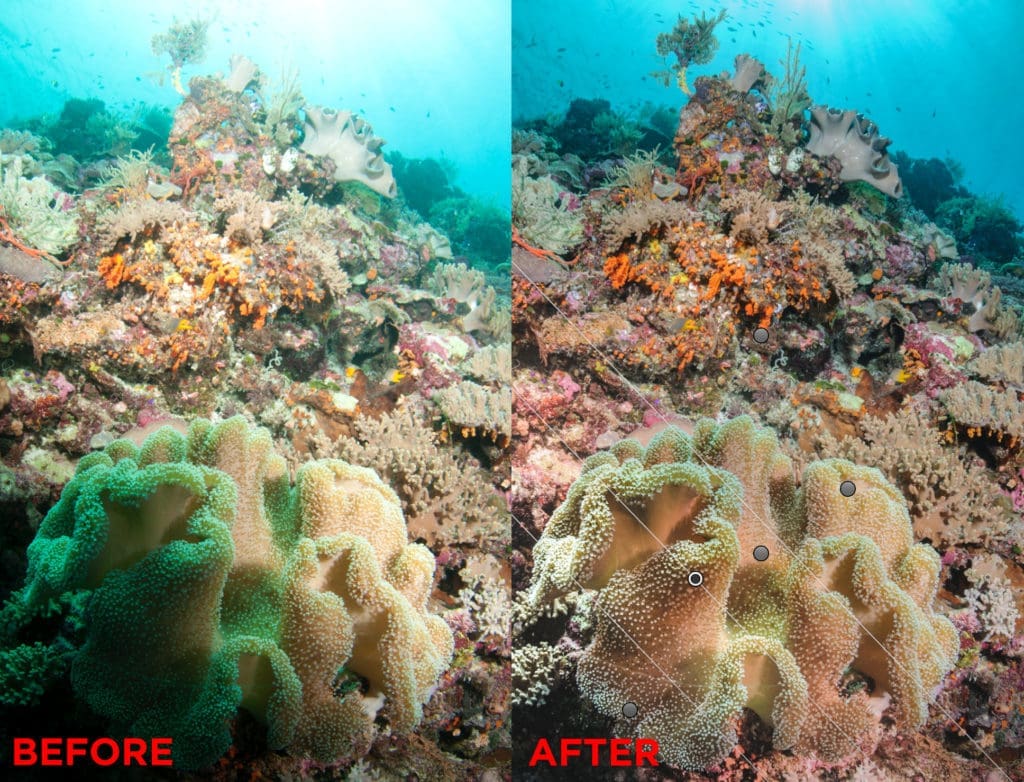
The Graduated Filter works like magic to adjust uneven lighting, restore color to a washed out water column, or to knock out unwanted ambient light at the edges of the image by locally adjusting white balance, exposure and saturation.
Each Graduated Filter consists of an “edit pin” at its center, and three parallel lines that represent the boundaries of the filter.
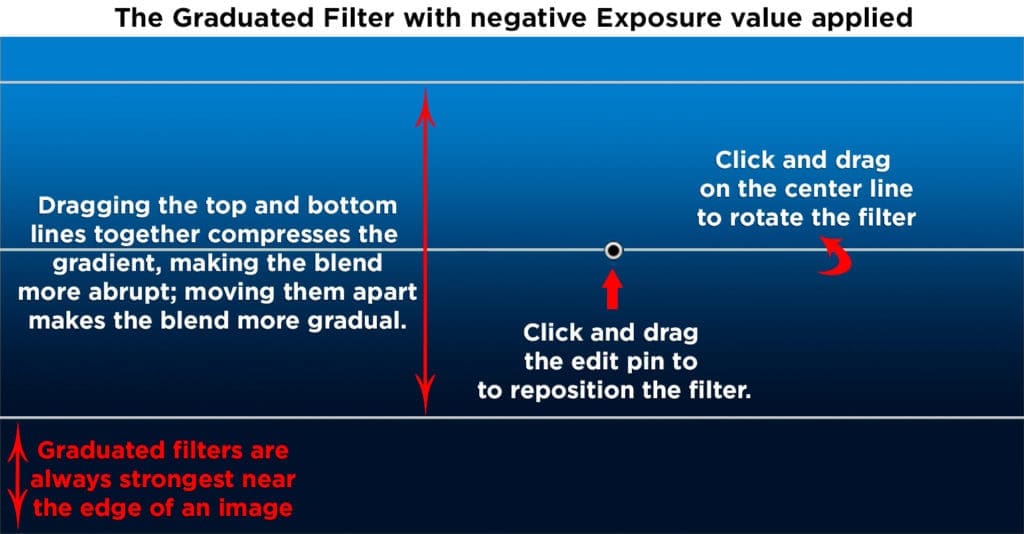
Rotate the filter by clicking and dragging on the center line to the side of the edit pin.
Spreading the inner and outer lines away from each other makes the gradient more gradual, and moving them closer together makes the gradient more pronounced.
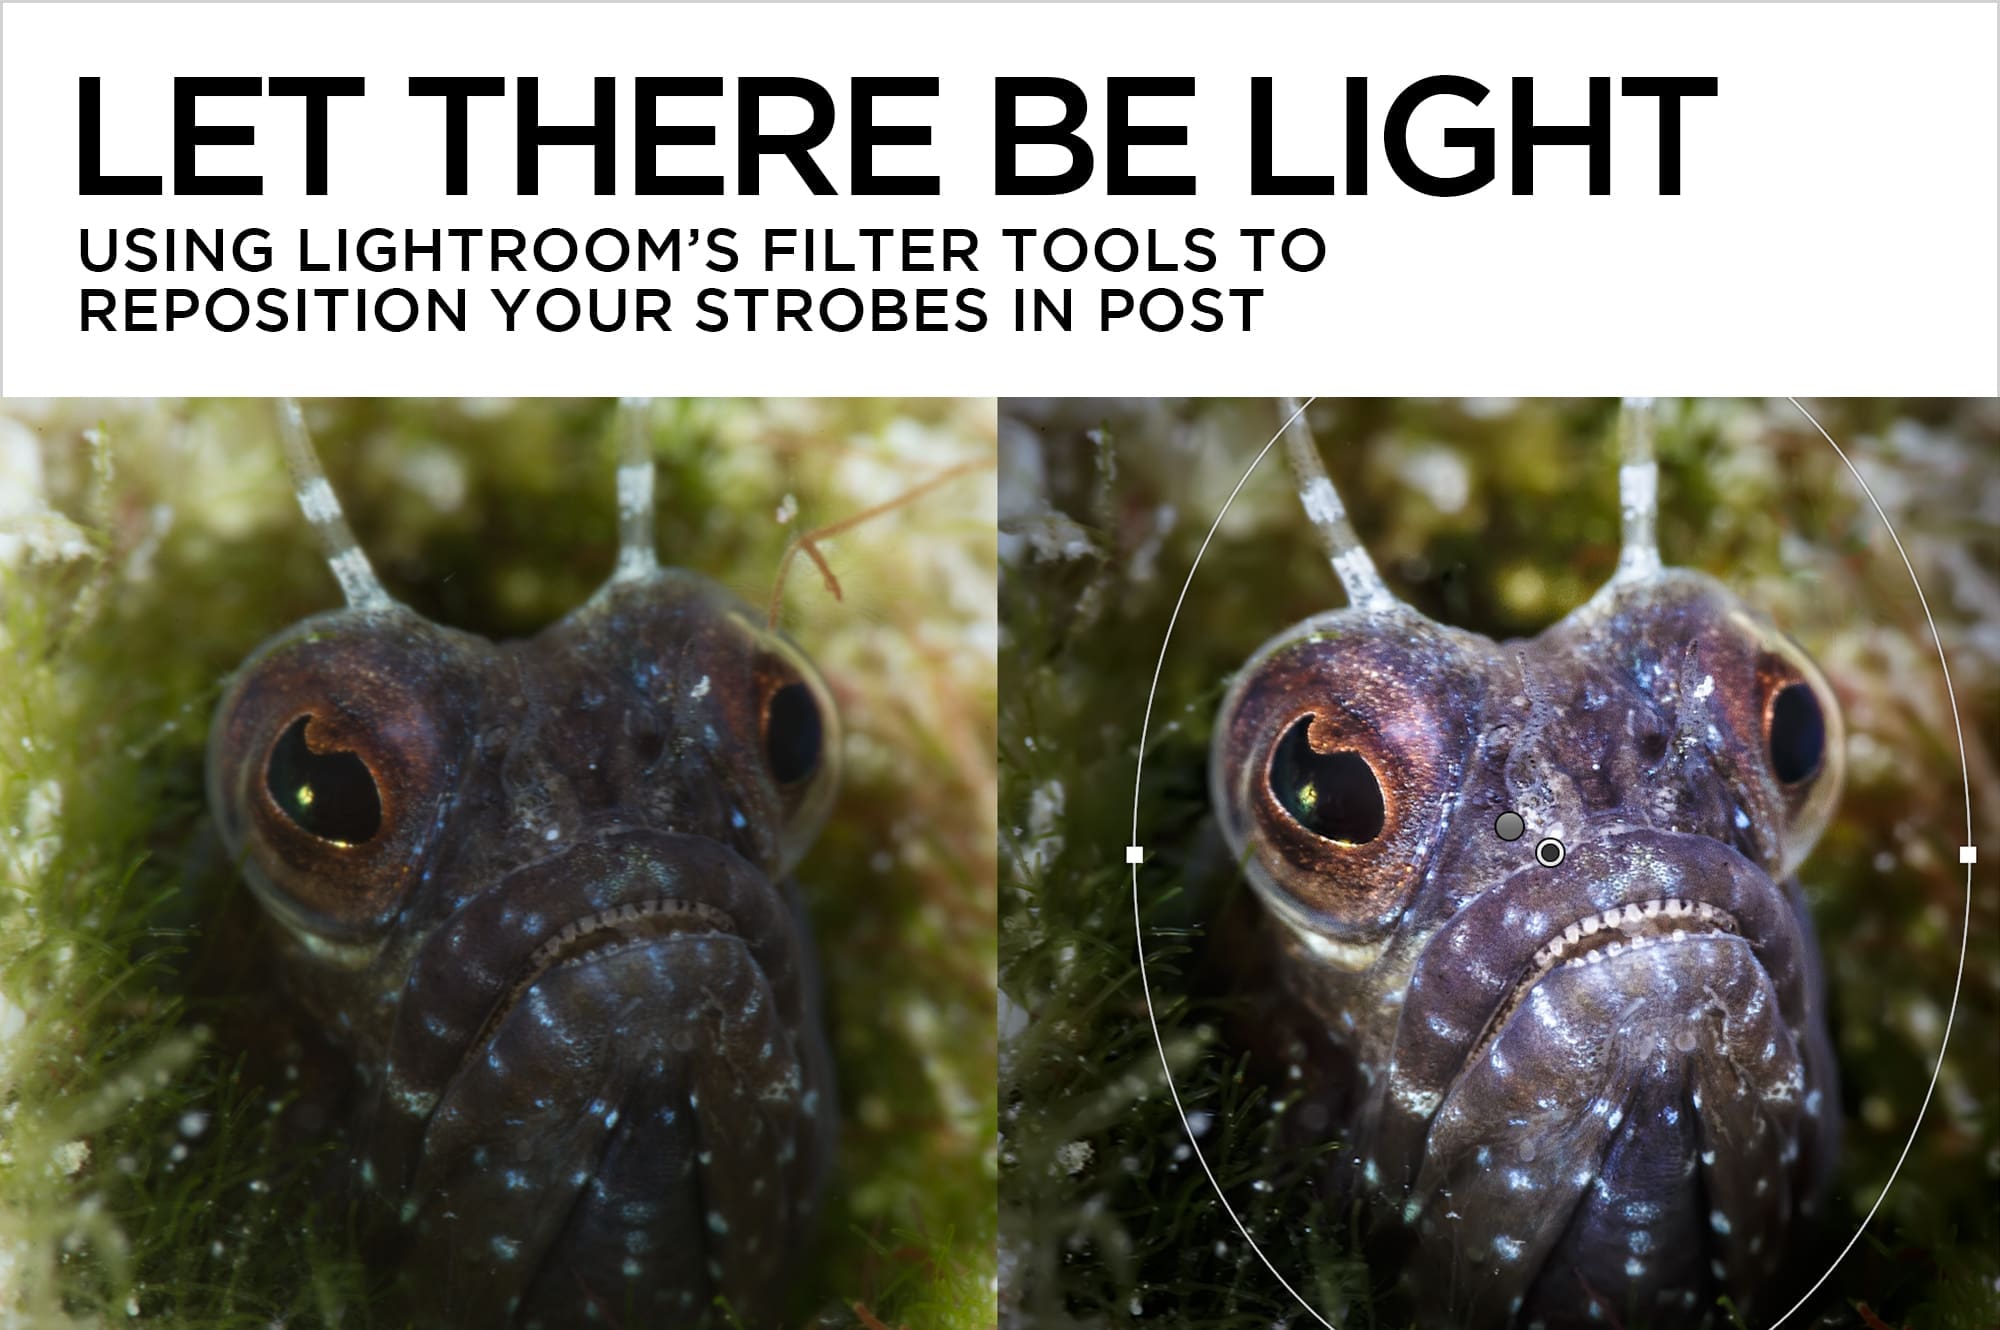
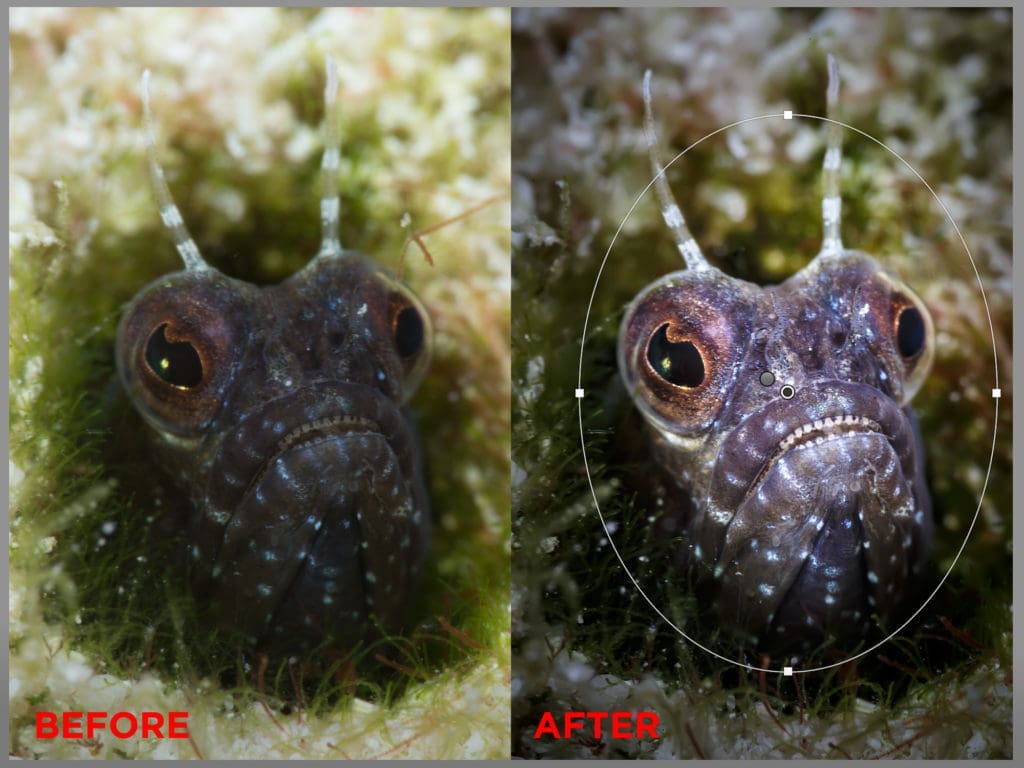
The Radial Filter is a radial gradient that can either be applied to the area inside the boundary of the filter, or the area on the outside of the boundary. To edit the inside of the filter, tick the “Invert Mask” checkbox on at the bottom of the Radial Filter tool drawer. Think invert = inside.
With Invert Mask checked on, the Radial Filter is a brilliant tool for adjusting strobe placement and selective sharpening. With Invert Mask checked off, it’s great for building custom vignettes.
Each Radial Filter has an “edit pin” at its center, and four “handles” on opposing sides of the filter boundary.
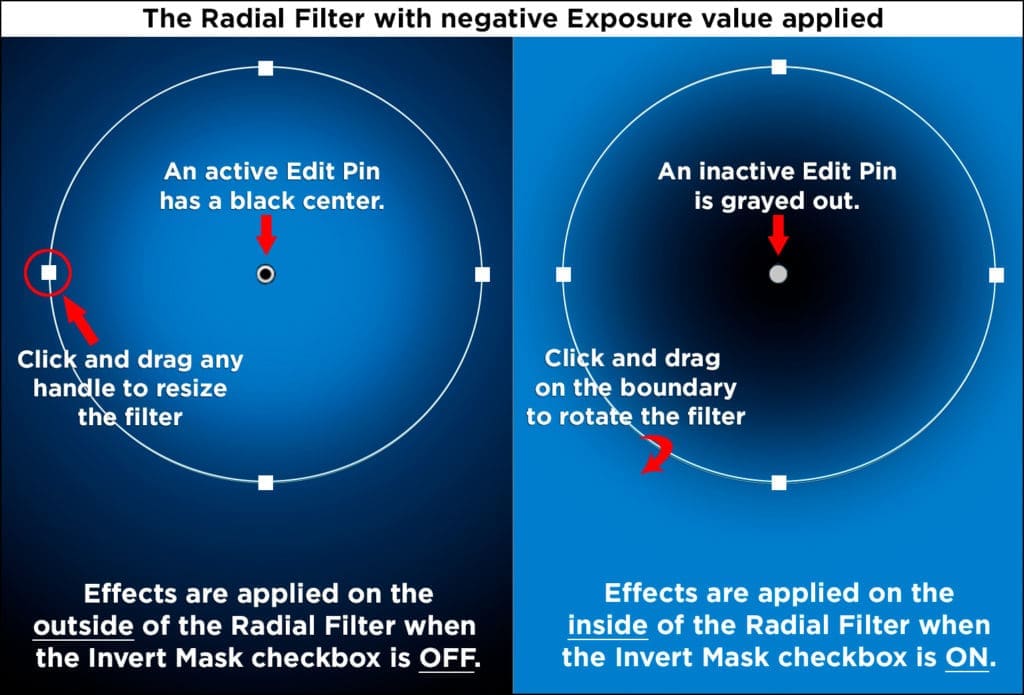
Hold down OPT/ALT while dragging a handle to change only one side of a radial filter.
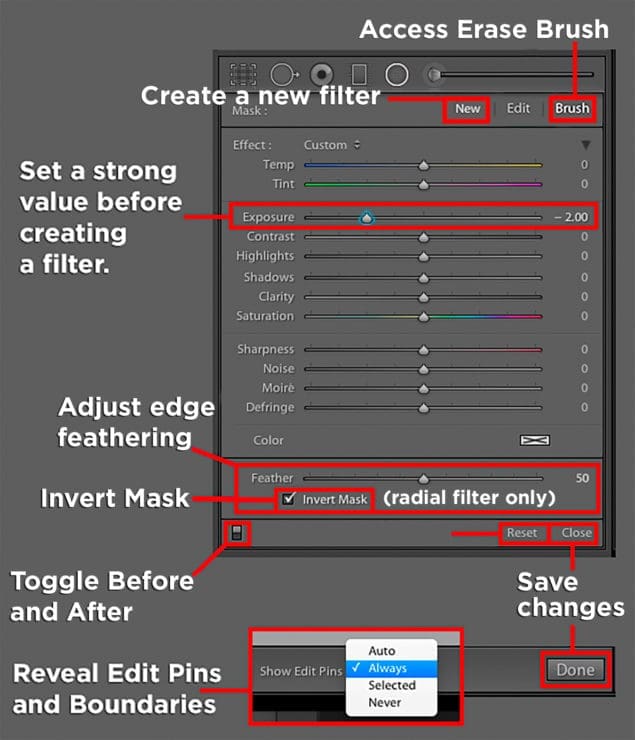
The “Feather” slider at the bottom of the tool panel adjusts the hardness of the filter’s edge.
Basic Filter Workflow
- To create a filter, select its icon in the Tool Strip.
- Set “Show Edit Pins” to “Always” in the tool options bar under the image, or use the keyboard shortcut “H”.
- Set an arbitrarily strong value on at least one slider. You won’t see anything happen until after you create a filter.
- To create a Graduated Filter, click somewhere near the middle of the area that needs adjustment, and drag inward towards the center of the image.
- To create a Radial Filter, click in the middle of the area you want to edit and drag diagonally outwards.
- Once you’ve got the filter in place, go back to the sliders and finesse your settings.
- To add additional filters, click “New” in the Mask options bar, set the sliders to new values, and drag out a new filter in the image.
- Commit your edits by clicking “Close” at the bottom of the tool drawer, or “Done” in the Toolbar underneath the image.
Filter Controls
- Clicking on a filter’s edit pin makes it active. Active pins have black centers, and inactive pins are gray.
- Reposition an active filter by clicking and dragging the edit pin.
- To reveal an overlay that shows where the active filter is affecting the image, tick on the “Show Selected Mask Overlay” checkbox in the tool options bar under the preview, or hit the keyboard shortcut letter “O” to toggle it on and off. Hovering the cursor over any edit pin, active or inactive, temporarily reveals its overlay.
- To delete the active filter, click on its edit pin and hit the delete key.
- Click “Reset” at the bottom of the tool drawer to delete all filters.
- Toggle the small “switch” at the bottom left of the Filter panel to reveal before and after views of just that panel.
Erasing Part of a Filter
- Click on the word “Brush” in the Mask options bar.
- Select an Erase brush from the Brush options section, or hold down Opt/Alt to temporarily access an eraser brush.
- Erase away unwanted parts of the filter.
You can find a video tutorial demonstrating the use of filters at http://bit.ly/goaskerin_reposition