Seven Deadly Booby Traps in Lightroom Classic
I love Lightroom, but it’s not without a few pitfalls. After years of real-world studio and classroom experience, I’ve identified a bunch of booby traps that consistently derail new and old users alike.
Booby Trap: “Default Catalog” at start up
When you first launch Lightroom, a new “default” catalog (.lrcat file) is created in your Users>Username>Pictures>Lightroom folder. Many people choose instead to keep this catalog on an external drive. If that’s the case, and the drive containing the catalog is offline (disconnected) when you launch Lightroom, Lightroom displays a clear-as-mud error message: “Lightroom Catalog was not found – would you like to open an existing catalog or use the default?”
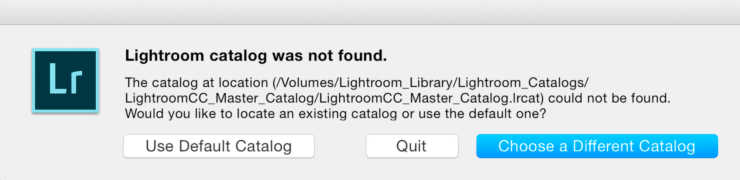
If you choose to open the “default” catalog, a new, empty Lightroom catalog is created in your Users>Username>Pictures>Lightroom folder, and opens up without showing any of your pictures. The workaround for this booby trap is to get in the habit of opening Lightroom by double-clicking on the correct “.lrcat” catalog file instead of using the Lightroom application icon. You’ll never create extraneous catalogs again.

Booby Trap: Copy vs. Add during Import

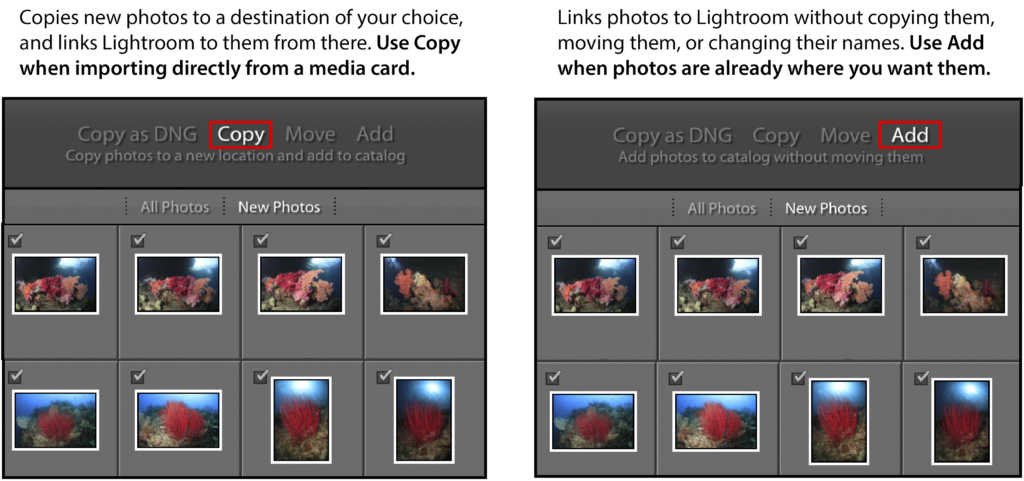
The Import Module is one big booby trap, especially for newbies. It’s the most important and least intuitive component of Lightroom. The language Adobe uses to describe the import process is, in itself, a booby trap. It implies that Lightroom somehow saves your photos IN to something, though in fact Lightroom simply links OUT to images wherever they live on your drive. A better way to think about the process is “referencing” or “linking” instead of “importing”. During import, tell Lightroom exactly where you want your images to reside. Don’t let Lightroom decide for you.
To set a destination folder for new images, set the action step (top center of the Import Module) to “Copy” or “Copy as DNG”. When the action step is set to “Add”, Lightroom simply links to photos at their current location and adds them to the catalog. Use “Add” if the images you’re importing already exist in the correct destination folder. When importing from a camera media card, flash drive, or other removable device, new originals should always be copied from the card to another destination.
Booby Trap: Double Destination panels in the Import Module
When importing via “Copy” or “Copy as DNG”, Lightroom offers two ways to set the destination for your new photos.
-
Select an existing folder or create a new subfolder from the browser in the “Destination” panel at the bottom right of the Import module.
-
Set a destination folder from the “TO:” menu at the top right of the Import Module. To use the “TO:” menu:
- Click the word “TO:” and select “Other Destination”.
- In the ensuing browser, navigate to the desired destination for your photos. You can select an existing folder or create a new one.
- Click the “Choose” button. The tiny line of text under the word “TO:” reflects the path for the destination folder.

When you’ve set a destination folder using the “TO:” menu at the top right of the Import module, pay attention! Don’t accidentally reset it in the Destination panel browser at the bottom right. It’s easy to inadvertently change the intended folder location by randomly clicking around the browser.
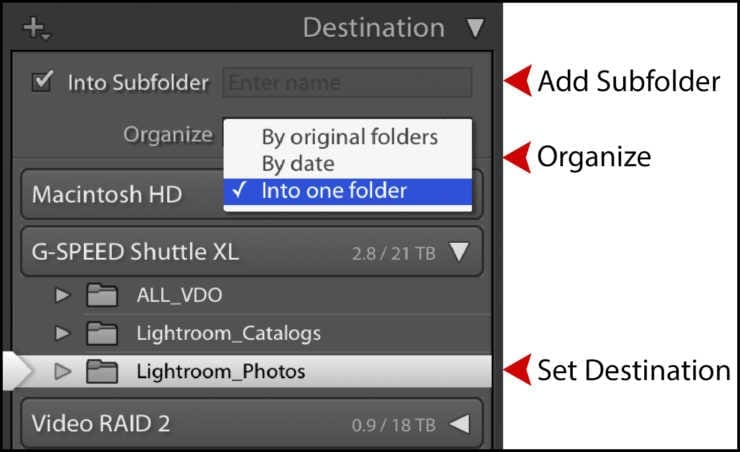
Booby Trap: Dated Folders at Import
No matter how you set the destination folder, be sure to specify a folder organization style via the “Organize” dropdown menu in the Destination panel.
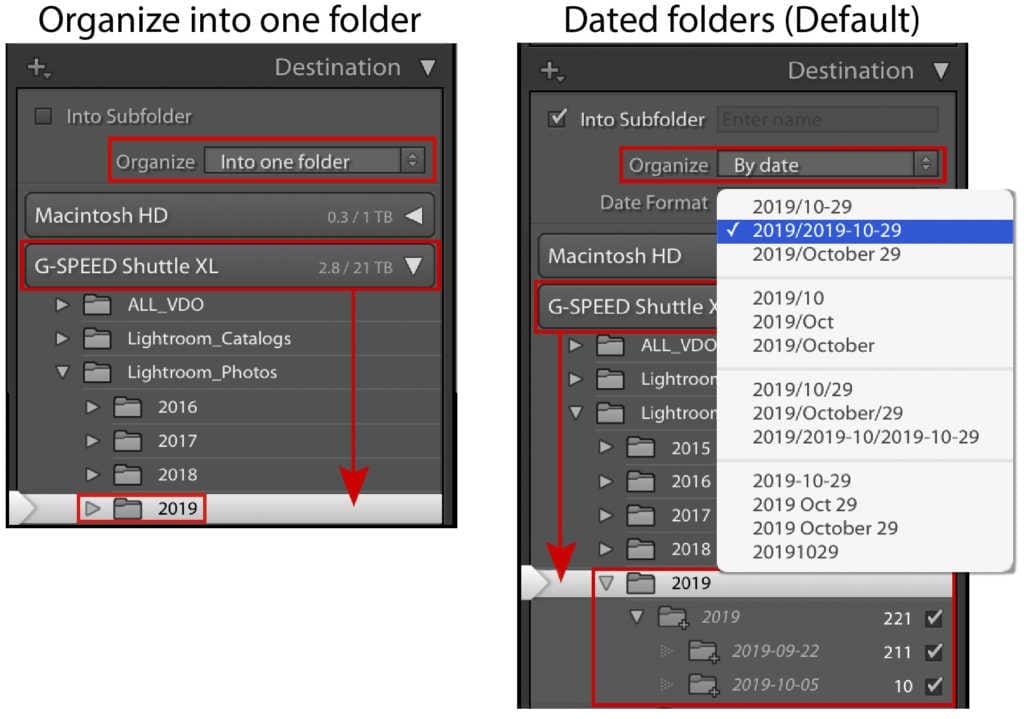
The default folder organization when importing to Lightroom is a series of dated folders and subfolders that’s nothing but confusing for many users. To avoid having Lightroom create an intricate structure of dated folders, select “Into one folder” from the “Organize” dropdown menu.
Booby Trap: Smart Previews at Import
Lightroom uses Smart Previews for many beneficial reasons, but if you don’t know what they are, don’t build them at import. Smart Previews are “lossy” (compressed) RAW files that look and act like your originals, which can be dangerous if you’re not aware that you’re using them.
If you’re not syncing to the cloud, editing images offline, or otherwise using Smart Previews in your workflow, leave the Smart Preview checkbox OFF.
Booby Trap: Delete vs. Remove
When you attempt to delete an image from Lightroom, the ensuing dialog box asks whether to “Delete from Disk” or “Remove”. By default, Lightroom highlights the “Remove” button, though “Remove” is most often the wrong choice. “Remove” takes the file and all accompanying metadata out of the Lightroom catalog, but leaves it in place on the disk. “Delete from Disk” puts the offending file in the Trash, ready to be permanently deleted.

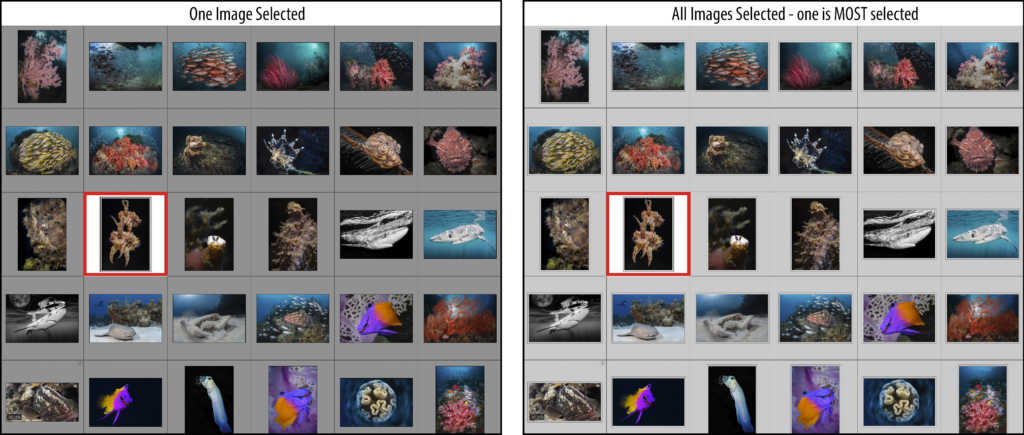
Booby Trap: Most Selected Image Illusion
When using Grid view in the Library Module, a single image, multiple images, or even all images can be selected. When every onscreen image is selected, it can sometimes seem like the “most selected” is the only one chosen, but anything done to the “most selected” image will also be applied to all other selected images. This is a potential disaster since any flag, rating, keyword, rotation, export, synchronization or deletion will be universally applied. Oops!
Pro Tip:
Rename your Lightroom Catalog to something that you can identify easily, like “Master Catalog”. With Lightroom closed, use the Finder or Explorer to rename the .lrcat file, and any accompanying .lrdata files, ie. Master Catalog.lrcat, Master Catalog Previews.lrcat, Master Catalog Helper.lrdata