
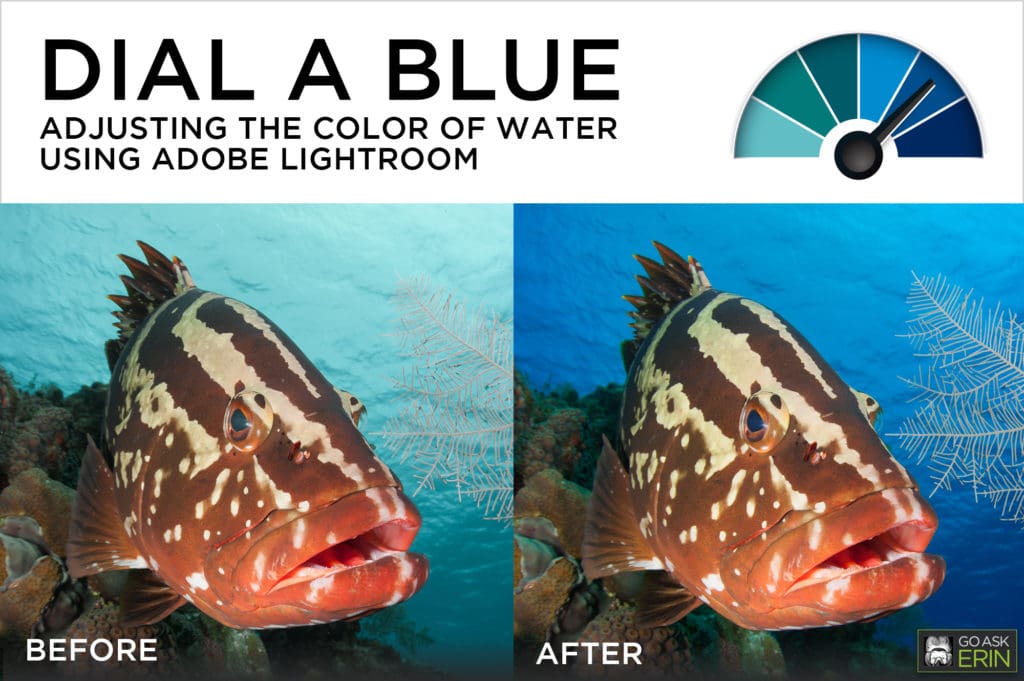
27 Oct Dial-a-Blue – Adjusting the Color of Water using Adobe Lightroom
I attribute the phrase “dial-a-blue” to Berkley White, shooter extraordinaire and owner of Backscatter Photo and Video. I first heard Berk use the phrase to describe a specific shooting technique, but I’ve since discovered many cool ways to also dial-a-blue during the editing process. In this tutorial, I make use of the massively powerful Hue Saturation and Luminance (HSL) Panel in Lightroom 5 to dial in the color of the water.
The Lightroom HSL Panel
Hue sliders affect the purity of individual colors in your photo. For instance, moving the blue Hue slider to the left shifts all blues in the image toward aqua, and sliding it to the right shifts them towards purple.
Saturation sliders affect the intensity of individual colors in your photo. A saturated color is vivid, and desaturated colors appear faded. Too much saturation looks hokey and obliterates detail, so resist the urge to oversaturate.
Luminance sliders affect the lightness or darkness of individual colors in your photo. These sliders can be particularly useful if you want to enhance sunrays or dappled light.
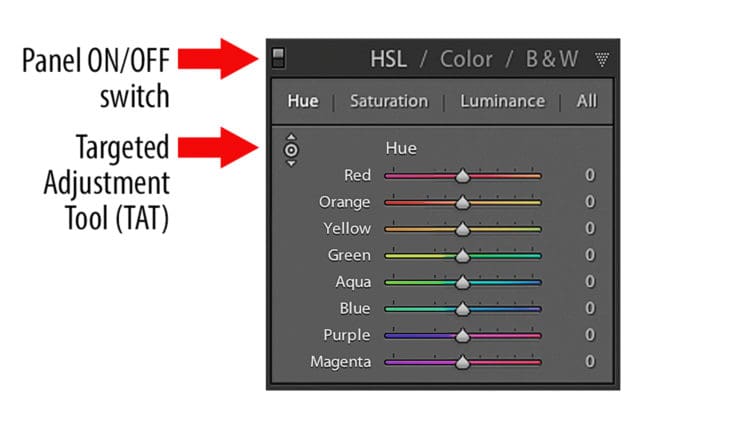
Panel On and Off
This switch toggles individual panel effects on and off. Toggling the switch is a good way to check the effect of just the HSL panel.
The Targeted Adjustment Tool (TAT)
Water is often a combination of colors. The Targeted Adjustment Tool (TAT) lets you interactively adjust multiple colors at one time. Clicking on the tool toggles activation on or off. With the TAT active, you can click and drag up or down directly on the image to adjust whatever combination of colors are under the cursor.
How to Make Basic Water Color Adjustments
For this tutorial, you’ll start with the Hue tab, but in real life you can use the panels in any order, and you don’t have to use all three.
- Open the HSL panel and click on Hue.
- Activate the TAT, and click and drag up or down in the part of your image you’d like to change. The TAT icon will temporarily disappear as you drag, and you’ll see at least one Hue slider moving in concert with your cursor. Lightroom is analyzing the pixels under the cursor, and adjusting each color accordingly.
- Next, select Saturation. The TAT should still be active, so click and drag to change the intensity of the water color. Easy does it.
- Finally, select Luminance and click and drag with the TAT to adjust the lightness or darkness of the water.
- Deactivate the TAT by clicking on it again in the panel.
- Check out a Before and After of your work. The Panel switch toggles the effect of just a single panel. The backslash key “/” displays your image from the very beginning, and “Y” displays a side-by-side comparison.
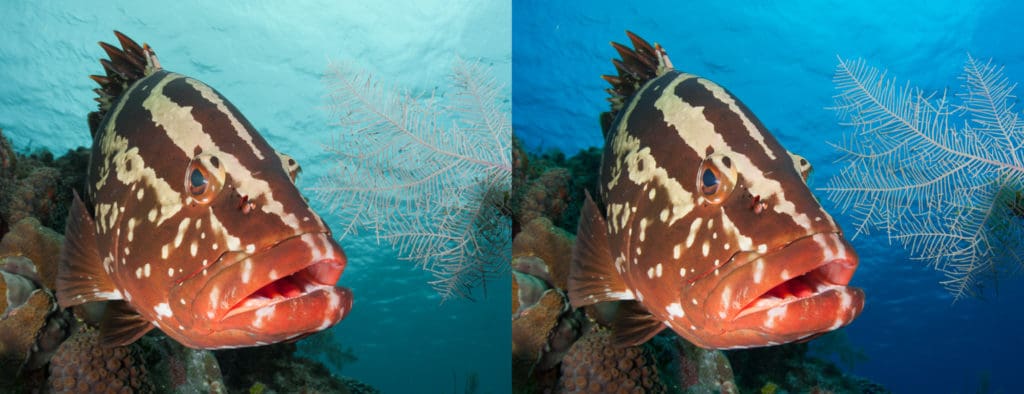
It’s important to remember that even though each slider in the HSL Panel represents a single color, they are still making global (whole image) adjustments. If you move a blue slider, it affects everything blue in your shot, including blue fish, blue coral, your buddy’s blue fins…you get the picture.
Bonus Dial-a-Blue recipes. They’re specific to certain scenarios, and they don’t work in every instance, but OMG it rocks when they do!
Purple-ish Water
- In the Hue Panel, slide the Purple slider to the left towards blue, and/or slide Magenta to the left towards purple.
- In the Saturation Panel, desaturate Magenta by sliding left, and saturate Blue and/or Purple by sliding right.
- In the Luminance Panel, move the Blue and Purple sliders both to the left to darken them.
Unwanted Ambient Light
- In the Hue Panel, nudge Aqua a little to the right towards blue, and/or Green a bit to the left towards yellow.
- In the Saturation Panel, desaturate Aqua by sliding to the left. Be careful not to go too far or parts of your shot will appear flat.
- In the Luminance Panel, slide the Aqua slider toward the right to add pop.
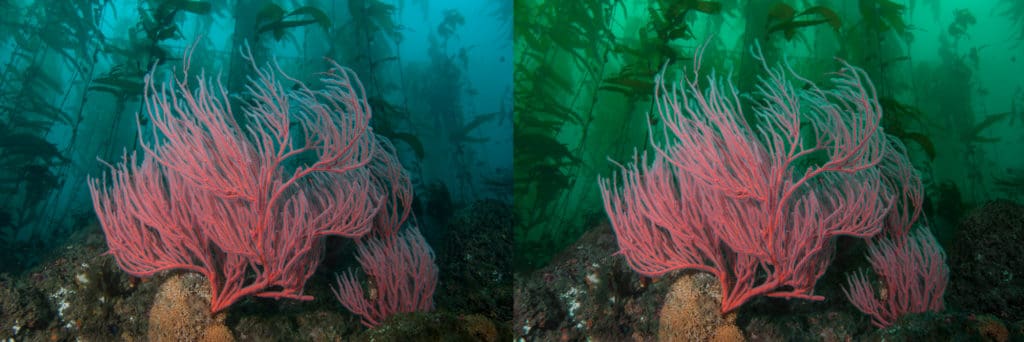
Dial-a-Green for Cold Water Shooters
- In the Hue Panel, slide Aqua to the left, towards green.
- In the Saturation Panel, saturate Aqua by sliding right.
- In the Luminance Panel, lighten Aqua by sliding right.
View a Video Tutorial of this feature:
Advanced Tip:
The HSL panel can be transformed into a powerful local tool via Smart Objects, Smart Filters, and layer masks in Photoshop CC.
- Select an image in Lightroom, and go to Photo>Edit In>Open as Smart Object in Photoshop. Photoshop will open, and you’ll see a tiny icon at the bottom right of the layer thumbnail indicating Smart Object status.
- Go to Filter>Camera Raw Filter. Camera Raw will open. Make changes in the HSL panel and click OK. Your image will reflect the changes globally.
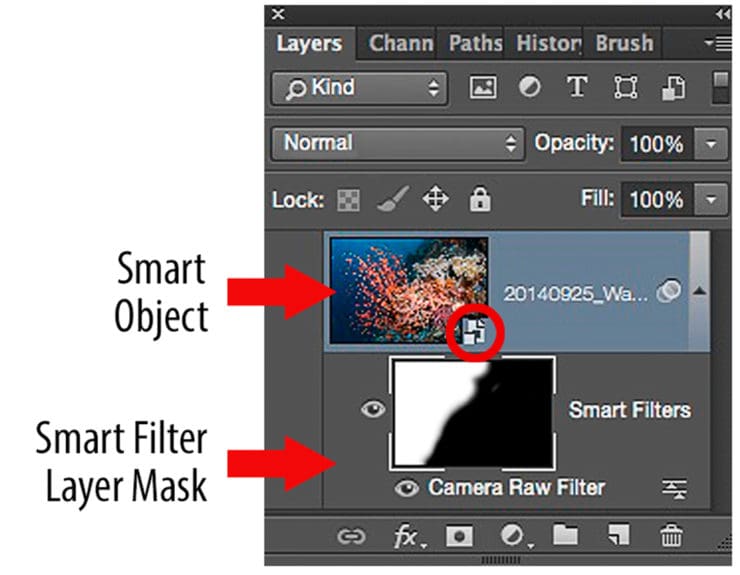
By painting in black on the Smart Filter layer mask, you can hide the HSL changes wherever you don’t want them applied.